ёРР»ЗЗТБЎӨҝЁВнЗЗөДЦёөјЎЈПлҝҙёь¶аЛыөДУЕРгЧчЖ·ЎЈ
ұҫҪМіМКЧҙОіцПЦФЪөЪ80ЖЪөД3DТХКхјТЎЈ
К№УГБЈЧУәН4DУ°ФәҙҙҪЁУРИӨөДНјПсПЦФЪұИТФНщИОәОКұәт¶јёьИЭТЧЈ¬К№УГјҜіЙІејюX-ParticlesЈ¬ҙҙҪЁҝҙЖрАҙәНёРҫхЖрАҙХжКөөДійПуәНУР»ъНјПсҝЙДЬКЗТ»ёцУРИӨөДМфХҪЎЈ
ҙҙҪЁійПуНјПсәНҙҙҪЁХжКөКАҪзНјПсТ»СщРиТӘјјКхЎЈ
РиТӘҝјВЗөДКВЗйәЬ¶аЈ¬ұИИз№№НјЎўЙ«ІКЎўөЖ№вЎўұИАэәНПа»ъЙиЦГЎЈЛдИ»ДгҝЙТФМшҪшИҘЈ¬өчХыТ»Р©ЙиЦГЈ¬өг»чдЦИҫЈ¬ҙҙФмТэИЛЧўДҝөДійПуНјПсөДГААцФЪУЪПёҪЪЎЈ
Из№ыДгҙУТ»ҝӘКјҫНЧціцәГөДҫц¶ЁЈ¬Дг»бәЬҝмөГөҪёьУРР§өДҪб№ыЎЈ
MAXON Cinema 4DКЗОТГЗөДКЧСЎ3DУҰУГіМРтЈ¬ТтОӘЛьұИЖдЛыУҰУГіМРтёьЦұ№ЫЎЈУРБЛMAXON Cinema 4D№ӨЧчКТЈ¬Mograph№ӨҫЯјҜ№ҰДЬЗҝҙуЗТТЧУЪК№УГЈ¬ДъҝЙТФіўКФј«ЖдұЖХжөД¶ҜМ¬ДЈДвЎЈ
X-Particles 3.0КЗ4DУ°ФәЧоИ«ГжЎўЧоПИҪшөДБЈЧУДЈДв№ӨҫЯЈ¬ҝЙТФҝШЦЖБЈЧУ№ЬөАөДёчёц·ҪГжЎЈЛдИ»ОТГЗ»№Г»УРЙоИлСРҫҝёЯј¶№ҰДЬЎӘЎӘИзPython»тXPresso NodesЎӘЎӘө«ОТГЗТСҫӯПнКЬөҪБЛРОіЙУРИӨДЈДвөДұгАыЎЈ
4DөзУ°ФәөДOctaneRenderКЗОТГЗКЧСЎөДдЦИҫТэЗжЎЈЛьКЗКАҪзЙПөЪТ»ёцТІКЗЧоҝмөДGPUјУЛЩөДЎўОЮЖ«јыөДЎўОпАнЙПХэИ·өДдЦИҫЖчЎЈЛьөД·ўХ№КЗҫӘИЛөДЈ¬ЛьјёәхКөКұөДҝЙКУ»ҜдЦИҫЈ¬МṩБЛёь¶аөДҙҙЧчКұјдәНёьЙЩөДөИҙэКұјдЎЈ
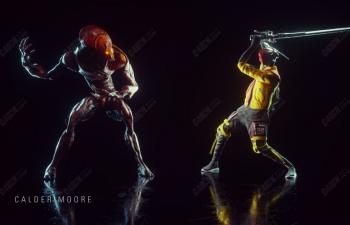
ұҫҪМіМҪ«ЧсСӯТ»ёцҙ«НіөД№эіМЈ¬ОТГЗҙшЧЕТ»ёцҙЦВФөДПл·ЁҪшИлИнјюЈ¬ҝҙҝҙјёёцРЎКұәу»біцПЦКІГҙЎЈ
И»әуЈ¬ОТГЗҪ«ПтДъХ№КҫТ»Р©»мәПХХГчјјКхЈ¬ТФј°ИзәОМнјУЦұ№ЫөДРБНйІДБПУлҙОұнГжЙўЙдЈ¬ХвЗҝөчБЛНјПсөДУР»ъёРҫхЎЈЧоәуЈ¬ОТГЗҪ«К№УГAdobe PhotoshopМнјУР§№ыәНиҰҙГЈ¬ТФФцЗҝХжКөёРЎЈ
ІҪЦи01ЁCЙиБўX-БЈЧУПөНі Step 01 ЁC Set up the X-Particles system


КЧПИОТГЗТӘПИҪЁБўТ»ёц»щұҫөДX-БЈЧУПөНіЎЈХвУРЦъУЪОТГЗұЈіЦЧйЦҜәНұЈіЦЖдУҰУРөДөИј¶ЦИРтФЪCINEMA 4DөДІЩЧчЛіРтЎЈНЁ№эХвСщЧцЈ¬ОТГЗИ·ұЈҙнОуІ»»б·ўЙъФЪДЈДвјЖЛгЎЈУлX-БЈЧУПөНіөДЙиЦГЈ¬ДгҝЙТФПлПуДЗАпөД·ўЙдЖчЈ¬·ўөз»ъЈ¬ёДРФјБЈ¬әНЖдЛы¶ФПуУҰёГФЪ¶ФПу№ЬАнЖчЎЈ
First weЎҜll set up a basic X-Particles system. This helps us to stay organised and keep the order of operations in Cinema 4D in its proper hierarchical order. By doing this we ensure that errors donЎҜt occur in the calculations of simulations. With the X-Particles system set up, you can visualise where emitters, generators, modifiers, and other objects should go in the object manager.
ІҪЦи02Ј¬ҙУТ»ёцОпМеөДұнГж·ўЙдStep 02 ЁC Emit from an objectЎҜs surface


ПВТ»ІҪЈ¬ОТГЗҪ«МнјУТ»ёцxpemitterәНЗтЎЈФЪ·ўЙдј«өДДҝұкұкЗ©ЦРЈ¬ОТГЗ»бёжЛЯЛьК№УГЗтМеөДұнГжЧчОӘ·ўЙдБЈЧУөДАҙФҙЎЈТтОӘДъЦ»РиТӘҙУөЪТ»ёцЦЎЦР·ўЙдБЈЧУЈ¬И»әуЧӘөҪЎ°·ўЙдЎұСЎПоҝЁЈ¬И»әуҙУЎ°·ўЙдДЈКҪЎұПВАӯІЛөҘЦРСЎФсЎ°ЕДЙгЎұЎЈСЎФсТӘФЪЙдјЖКэЧЦ¶ОЦР·ўЙдөДБЈЧУКэЎЈДгҝЙТФҝӘКјТ»ёцҪПөНөДКэЧЦЈ¬Лө5000Ј¬ҝмЛЩФӨААДЈДвЎЈЧоәуЈ¬СЎФсДгөДБЈЧУөД°лҫ¶Ј¬ФЪЛыГЗөД№жДЈЙПҙҙҪЁТ»Р©ұд»ҜЈ¬ІўјхЙЩБЈЧУөДЛЩ¶ИОӘБгЎЈ
Next, weЎҜll add an xpEmitter and a sphere. In the emitterЎҜs object tab weЎҜll tell it to use the surface of the sphere as the source to emit particles from. Since youЎҜll want to emit particles from the first frame only, go to the Emission tab, and select Shot from the Emission mode drop-down menu. Choose how many particles youЎҜd like to be emitted in the Shot Count field. You can start with a lower number, say 5,000, to preview simulations quickly. Lastly, choose the radius of your particles, create some variation in their scale, and reduce the particlesЎҜ speed to zero.
ІҪЦи03ЁCјУX-БЈЧУёДРФјБ Step 03 ЁC Add X-Particles modifiers


ФЪХвёціЎҫ°ЦРЈ¬ОТГЗҪ«МнјУБҪёцРЮКО·ыЈ¬xpturbulenceәНxpfollowsurfaceЎЈёДРФјБөДxpturbulenceТЖ¶ҜБЈЧУФЪІ»Н¬ұд»ҜУР»ъөШЎЈёДРФјБөДxpfollowsurfaceАӯФЛ¶ҜөДБЈЧУФЪИОәООпМеұнГжЈ¬ЛьКЗТэУГЎЈФЪХвёцАэЧУЦРЈ¬ОТГЗТӘМнјУН¬Т»БмУтөДxpfollowsurface¶ФПуБРұнЎЈХвСщЈ¬ОпМеҫН»бФЪЗтМеұнГжЙП·ўіцЈ¬ұ»НДБчТЖ¶ҜЈ¬ІўҪ«ЧсСӯЗтМеөДјёәОРОЧҙЎЈ
In this scene, weЎҜll add two modifiers, xpTurbulence and xpFollowSurface. The xpTurbulence modifier moves the particles around in an organic manner with different variations. The xpFollowSurface modifier pulls moving particles across whatever objectЎҜs surface it is referencing. In this example, weЎҜre going to add the same sphere to the xpFollowSurface object list. This way the objects will emit on the sphereЎҜs surface, get moved around by the turbulence, and will follow the geometry of the sphere.
ІҪЦи04Ј¬ТЎТ»ТЎ Step 04 ЁC Shake things up


X-БЈЧУөДНДБчөДёДРФјБУРРн¶аСЎПоЈ¬ө«ЖдҫнЗъөДФлЙщКЗ·ЗіЈУРИӨөДЎЈНЁ№эөчХы»мәПәНМнјУЦөЈ¬ДгҝЙТФҙҙҪЁУРИӨөДәНУР»ъөДФЛ¶ҜЎЈДгҝЙТФУГДгөДДЈДвУОП·әНөчХыХвР©ЦөЈ¬ТФј°№жДЈЈ¬ЖөВКЈ¬ТфөчәНЗҝ¶ИЦөАҙҙпөҪІ»Н¬өДҪб№ыЎЈ
X-ParticlesЎҜ turbulence modifier has many options, but its curl noise is very interesting. By adjusting the Blend and Add values, you can create interesting and organic movements. You can play with your simulation and adjust these values, as well as the scale, frequency, octaves and strength values to achieve different results.
ІҪЦи05МнјУБЈЧУЕцЧІ Step 05 ЁC Add particle collisions
 

өҪПЦФЪОӘЦ№Ј¬ОТГЗөДБЈЧУЦ»УлЗтМеөДұнГжПа»ҘЧчУГЎЈЛыГЗІ»КЗПа»ҘЧчУГЈ¬КЗПаҪ»өДЎЈОӘБЛ·АЦ№ХвТ»өгөД·Ҫ·ЁЦ®Т»КЗФцјУТ»ёцxpppcollisions¶ҜМ¬¶ФПуәНЧФОТЕцЧІјмІйЎЈБЈЧУПЦФЪ»бПа»ҘЧчУГЈ¬МшФҫәН»¬¶ҜЈ¬Т»ө©ЛыГЗЕцЧІЎЈУРР©ИФИ»»бПаҪ»Ј¬ө«Г»УРТФЗ°ДЗГҙ¶аЎЈјЗЧЎЈ¬Ҫ«ФцјУX-БЈЧУРиТӘөДјЖЛгБҝЈ¬ІўДЈДвІ»»бЕЬөДТ»СщҝмЎЈІ»ТӘөЈРДЈ¬ЛдИ»ОТГЗҝЙТФ»әҙжОТГЗөДБЈЧУДЈДвЎЈ
Up until now, our particles only interact with the surface of the sphere. They are not interacting with each other and are intersecting. One way to prevent this is to add an xpPPCollisions dynamics object and check Self Collisions. The particles will now interact with each other, bouncing and sliding away once they collide. Some will still intersect, but not as much as before. Keep in mind, adding this increases the amount of calculations that X-Particles needs to make, and the simulation will not run as fast. Not to worry though as we can cache our particle simulations.
ІҪЦи06»әҙжДЈДв Step 06 ЁC Cache the simulation

өДxpcache¶ФПуұШРлұЈҙжЈ¬№ЫПлЈ¬ПҙөУИЭТЧНЁ№эЦШБЈЧУДЈДвЎЈЛь»№И·ұЈДгҝҙөҪФЪДгөДКУНјЦРЈ¬РБНйЦөөДПЦіЎ№ЫЦЪКЗКІГҙДг»бҝҙөҪФЪCINEMA 4DөДНјЖ¬дҜААЖчЈ¬ДгөДЧоәуөДдЦИҫЎЈХвСщЈ¬xpcache¶ФПуМнјУөҪДгөДіЎҫ°Ј¬И»әуөг»чЙъіЙ»әҙжЎЈX-БЈЧУҪ«ұЈҙжөҪДъөДУІЕМЗэ¶ҜЖчәН·ВХжҝЙТФІБПҙНЁ№эСЎФсФЪДъөДКұјдұнЈ¬ДгПІ»¶ФхСщөДҝЕБЈНв№ЫҝтјЬЎЈ
The xpCache object is essential to saving, visualising, and scrubbing easily through heavy particle simulations. It also ensures that what you see in your viewport, or OctaneЎҜs Live Viewer is what you will see in Cinema 4DЎҜs Picture Viewer and your final render. With that, add an xpCache object to your scene, and click Build Cache. X-Particles will save the simulation to your hard drive and you can scrub through to select a frame on your timeline where you like how the particles look.
ІҪЦи07Ј¬ЙиЦГРБНйЦөПа»ъ Step 07 ЁC Set up the Octane Camera


УЙУЪХвКЗТ»ёцУР»ъөДЈ¬јёәх·ЦЧУҪб№№Ј¬ДгУҰёГҝјВЗөҪДгөДПа»ъөДҪ№ҫаәНЙо¶ИөДТ»Р©ҝјВЗЎЈОўҫаҫөН·өДЗіҫ°ЙоОЕГыЈ¬ҫӯіЈКЗ100mmТФЙПЎЈХвЗҝөчОТГЗКФНјДЈ·ВРЎ№жДЈЎЈҪЁБўТ»ёцРБНйЦөөДПа»ъЈ¬ФЪКфРФ№ЬАнЖчёДұдҪ№ҫа200mmәНЖдЛыЦөКөСйЦРҝҙөҪІ»Н¬өДР§№ыЎЈЖдЦРТ»ёцЧо·ҪұгөДOctaneRenderМШөгКЗҝмЛЩөг»чДгПлЧЁЧўУЪОпМе»тБЈЧУСЎФсДгөДҪ№өгҫаАлөДДЬБҰЎЈДгҝЙТФФЪПЦіЎ№ЫЦЪХвСщЧцЎЈИЎПыЧФ¶Ҝ¶ФҪ№Па»ъөДРБНйЦөұкЗ©өДұЎРННёГчЖ¬өДСЎПоҝЁЈ¬И»әуФцјУ№вИҰЦөАҙҙҙҪЁТ»ёцёьЗіөДҫ°ЙоЎЈ
Since this is an organic, almost molecular structure, you should give some consideration to the focal length and depth of field of your camera. Macro lenses are famous for their shallow depth of field, and often are 100mm or more. This emphasises the tiny scale weЎҜre trying to emulate. Set up an Octane Camera, and in the Attributes manager change the focal length to 200mm and experiment with other values to see the different effects. One of the most convenient features of OctaneRender is the ability to quickly select your focus distance by clicking on the object or particles you want to focus on. You can do this in the Live Viewer.Deselect Auto Focus in the thinLens tab of the Octane Camera tag, then increase the aperture value to create a more shallow depth of field.
ІҪЦи08Ј¬өШПВЙўЙдІДБП Step 08 ЁC Subsurface scattering materials


ОТГЗСЎФсБЛК№УГТ»ЦЦОпЦКөДөШПВЙўЙдЈ¬ТтОӘЛьҝЙТФФцјУТ»ёцЙъГьёРөД¶ФПуЎЈКЧПИЈ¬ҙҙҪЁТ»ёцРВөДРБНйЦөА©ЙўІДБПЈ¬ІўФЪВю·ҙЙдұкЗ©ЦРСЎФсТ»ёц»щұҫСХЙ«ЎЈПВҙОИҘҙ«КдСЎПоҝЁЈ¬ІўМнјУТ»ёцРБНйЦөrgbspectrumОЖАнөДОЖАнНЁөАЎЈСЎФсДгПлҙ«КдөДСХЙ«Т»ө©№вҙ©№эБЈЧУЎЈЧоәуЈ¬ФЪЎ°ҪйЦКЎұСЎПоҝЁЦРЈ¬ПтОЖАнНЁөАМнјУТ»ёцЙўЙдҪйЦКОЖАнЎЈХвҪ«ёшДгөДОьКХәНЙўЙдОЖАнЎЈҙу¶аКэКұәтЈ¬ДгҝЙТФФЪ0ҙҰБфПВОьКХәН0.5өДЙўЙдЎЈұкіЯ»¬ҝйКЗКІГҙҝШЦЖИзәОИЭТЧөШ№вұ»ОьКХәНҙ«ІҘНЁ№эөД¶ФП󣬻тФЪХвЦЦЗйҝцПВЈ¬ҝЕБЈЎЈОТГЗТСҫӯК№УГБЛ1.75ЎЈ
We chose to use a material with subsurface scattering because it can add a sense of life to objects. First, create a new Octane Diffuse material, and choose a base colour in the Diffuse tab. Next go to the Transmission tab, and add an Octane RGBSpectrum texture to the Texture channel. Choose the colour you would like to transmit once light goes through the particle. Finally, in the Medium tab, add a Scattering Medium texture to the texture channel. This will give you absorption and scattering textures. Most times, you can leave Absorption at 0 and Scattering at 0.5. The scale slider is what controls how easily light can be absorbed and transmitted through the object ЁC or in this case, the particles. WeЎҜve used 1.75.
ІҪЦи09Ј¬ХХГч Step 09 ЁC Lighting


ПВТ»ІҪМнјУТ»ёцРБНйЦөөДИХ№в¶ФПуөҪіЎҫ°ЦРЎЈЛьЕдұёБЛБҪёцұкЗ©Ј¬Т»ёцРБНйЦөИХ№вұкЗ©Ј¬әНМ«СфұнҙпұкЗ©ЎЈКЧПИЈ¬И·ұЈМ«СфұнҙпКҪұкјЗКЗНЁ№эјмІйЛьФЪ»щұҫЎЈҝШЦЖМ«СфөДО»ЦГЈ¬НЁ№эК№УГІ»Н¬өДҫӯ¶ИәНОі¶ИЦөЈ¬әНКөСйУлІ»Н¬өДНв№ЫЈЁИХіцЈ¬ЦРОзәНИХВдЈ©ЎЈПЦФЪСЎФсРБНйЦөИХ№вұкЗ©ЎЈХвАпөДСЎПоКЗЦұ№ЫөДәНБй»оөДЎЈДъҝЙТФФцјУЧЗ¶ИЈ¬№ҰВКЈ¬ұұЖ«ТЖәНМ«СфөДҙуРЎЈ¬ЛщТФКөСйЎЈОТГЗёДұдБЛМмҝХөДСХЙ«әНМ«СфөДСХЙ«КЗОВЕҜәНГчББЎЈ
Next add an Octane Daylight object to the scene. It comes with two tags, an Octane Daylight Tag, and Sun Expression Tag. First, make sure the Sun Expression Tag is enabled by checking it under Basic. Control the placement of the sun by using different longitude and latitude values, and experiment with different looks (sunrise, midday and sunset). Now select the Octane Daylight tag. The options in here are intuitive and flexible. You can increase turbidity, power, north offset and sun size, so experiment again. WeЎҜve changed the sky colour and sun colour to be warmer and brighter.
ІҪЦи10Ј¬ҙҙТвХХГчСЎФс Step 10 ЁC Creative lighting choices


МнјУТ»ёцРБНйЦөөДДҝұкЗшУтКЗЧціцТ»ёцҫц¶ЁЈ¬ТтОӘОТГЗПлУРТ»ЦЦ¶ЁПтХХГчәННЖ¶Ҝёь¶аөД№вҪшИлМШ¶ЁЗшУтөДҝЕБЈЎЈТӘЧцөҪХвТ»өгЈ¬СЎФсөД·¶О§Ј¬И»әуМнјУТ»ёцРБНйЦөөДДҝұкЗшУтЎЈ№вҪ«УАФ¶ЦёПтЗтМеЎЈДъҝЙТФөчХыРБНйЦөөД№вөДОВ¶ИКЗОВЕҜөД»тАдИҙЖчЈ¬әН№вөД№ҰВКәН·ЦЕдТӘёьЗҝ»тёьИхЎЈИз№ыДгНЈУГөДИХ№вЈ¬ДгҝЙТФ№ЫПлЗшУтөЖ№вКЗ¶аЙЩ№ұПЧЎЈ
Adding an Octane targeted Arealight was a decision made because we wanted to have a sense of directional lighting and push more light into a specific area of the particles. To do this, select the sphere, and then add an Octane targeted Arealight. The light will always point at the sphere. You can adjust the temperature of the Octane Light to be warmer or cooler, and the power and distribution of the light to be stronger or weaker. If you deactivate the Daylight, you can visualise how much the area light is contributing.
ІҪЦи11Ј¬ҪшРРҙҙФмРФөДөчХы Step 11 ЁC Make creative adjustments


ПЦФЪЈ¬ДгУРДгөДХХГчЙиЦГЈ¬»ШИҘЈ¬ІўЧчіцТ»Р©өчХыЈ¬ДгөДІДБПЈ¬Па»ъәНЧйіЙЎЈ»ЁКұјдОўөчХыМеөДНв№ЫЈ¬Н¬Кұ»Ш№ЛТ»Р©ДгТФЗ°өДҫц¶ЁЎЈТІРнДгПлИГНДБчЙФОўРЎТ»өгЈҝТІРнДгөДСХЙ«М«БББЛЈҝДгөДМ«СфМ«БББЛВрЈҝДгөДСЫҫҰИҘДДАпЈҝХвР©¶јКЗәЬәГөДОКМвЈ¬ОКЧФјәЈ¬өұЧјұёДгөДЧоЦХдЦИҫЎЈ
Now that you have your lighting set up, go back and make some adjustments to your materials, camera and composition. Take time to fine-tune the overall look while reviewing some of your previous decisions. Maybe youЎҜd like to make the turbulence slightly smaller? Maybe your colours are too bright? Is your sun too bright? Where does your eye go to? These are all good questions to ask yourself, when preparing for your final render.
ІҪЦи12дЦИҫҝјВЗ Step 12 ЁC Rendering considerations


OctaneRenderУРРн¶адЦИҫДЪәЛөДСЎФсЎЈОТГЗНЁіЈСЎФс1.14ЦұҪУХХГчәНgidiffuseСЎПоЎЈХвІ»КЗ№«ХэөДВ·ҫ¶Ч·ЧЩЈ¬ө«ЛьМṩБЛ·ЗіЈұЖХжөДР§№ыҝмЈ¬ТтОӘХвКЗТ»ёційПуөДдЦИҫЈ¬ОТГЗҝЙТФК№УГЛьЈ¬¶шІ»УГөЈРДЧјИ·РФЎЈДгҝЙТФФцјУҫөГжЈ¬№вФуәНГЦВюФЪРБНйЦөЙиЦГГж°еөДЙо¶ИөД·ҪКҪАҙМбёЯ№в·ҙЙдФЪЧоәуөДдЦИҫЎЈУЙУЪОТГЗК№УГөДІДБПУлөШПВЙўЙдЈ¬ОТГЗФцјУБЛВю·ҙЙдөДЙо¶ИОӘ8Ј¬К№№вУлБЈЧУФЪТ»ёцёьБоИЛРЕ·юөД·ҪКҪҪшРРҪ»»ҘЎЈФЩҙОЈ¬ДгҝЙТФіўКФІ»Н¬өДЙиЦГЈ¬ҝҙҝҙКІГҙЧчЖ·ЎЈҪПөНөДЙиЦГјУЛЩдЦИҫКұјдЈ¬ө«ҪөөНБЛЦКБҝЎЈөгдЦИҫИ»әуИГОТГЗФЪAdobe PSНјПуҙҰАнИнјюЎЈ
OctaneRender has many render kernels to choose from. We usually choose Directlighting and the GIDiffuse option. This isnЎҜt unbiased path tracing, but it provides very realistic results quickly, and because this is an abstract render, we can use it without being worried about exactness. You can increase the Specular, Glossy and Diffuse depths in the Octane Settings panel to improve the way light bounces in the final render. Since we were using a material with subsurface scattering, we increased the Diffuse depth to 8 so that light would interact with the particles in a more convincing manner. Again you can experiment with the different settings to see what works. Lower settings speed up render times, but reduces quality. Hit render and then letЎҜs head over to Adobe Photoshop.
ІҪЦи13ЁCМнјУИұПЭәННкіЙЧоәуөДөчХы Step 13 ЁC Add imperfections and finish with final tweaks


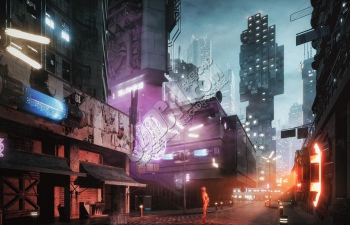
AdobeЈ¬PSНјПуҙҰАнИнјюЈ¬јУЙПХвСщөДҫөН·»ыұдЎўЙ«ІоәНФОУ°Ј¬ЗҝөчФЪПЦКөКАҪзөДЙгПс»ъ·ўПЦөДИұПЭЎЈХвЩѡПоҝЙТФФЪҫөН·РЈХэВЛҫөПВАӯІЛөҘПВХТөҪЎЈЙ«ІК·Цј¶КЗТ»ЦЦЦч№ЫөДОпЦКЈ¬КЗТ»ЦЦәЬУРҙҙТвөДСЎФсЎЈДгСЎФсЧцКІГҙУлДгөДСХЙ«»бЛөІ»Н¬өД¶«Оч№ШУЪДгөДРОПуЎЈФЪТ»°гЗйҝцПВЈ¬Т»ёцІ»М«»оФҫөДРОПуЛЖәхёьХжКөЎЈҙЛНвЈ¬КАҪзЙПГ»УРҙҝәЪЙ«өД¶«ОчЈ¬ГҝТ»ёцәЪЙ«¶јУРТ»ЦЦСХЙ«өДСХЙ«ЎЈЧоәуЈ¬јУіҫЈ¬PSНјПуҙҰАнИнјю№вР№В©»тЖдЛыОЖАнУРЦъУЪҙҙФмТ»ёцҝХјдёРәНЙо¶ИЎЈ»ТіҫҝЙТФҙҙҪЁТ»ёцИнұЯЛўУлёЯЙўЙдЙиЦГЈ¬»тУлЙЁГиөД»ТіҫҝЕБЈҙУ»ҘБӘНшЙПөДёЯ·ЦұжВКНјПсЎЈ
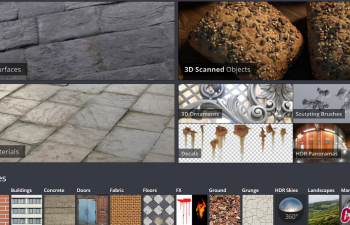
In Adobe Photoshop, add things like lens distortion, chromatic aberration, and vignetting to emphasise the imperfections found in real-world cameras. Most of these options can be found under the Lens Correction filter dropdown. Colour grading an image is always a subjective matter, and a very creative choice. What you choose to do with you colour will say different things about your image. In general, a less vibrant image seems more real. Also, there is no such thing as pure black in the world, and every black has a touch of colour to it. Finally, adding dust, light leaks or other textures in Photoshop helps to create a sense of space and depth. Dust can be created with a soft-edged brush with high scattering settings, or with hi-res images of scanned dust particles from the internet.
|


 /9
/9 


![[34G]і¬ҙуҙҙТвЙијЖҫ«Ж·C4D№ӨіМФҙОДјю](https://img.c4dcn.com/attachment/forum/threadcover/4b/5e/19413.jpg)